1. 분석용 데이터 품질 관리(학습 자료)
2. 군집 분석:
1) 군집분석
서로 유사한 정도에 따라 다수의 객체를 군집으로 나누는 작업 또는 이에 기반한 분석을 의미한다.
- 유사도가 높은 데이터끼리 그룹화 (대표적으로 유클리드 거리식 이용)
- 계층형 클러스터링과 비계층형 클러스터링으로 분류
- 주요 알고리즘 : k-means, hierarchical
1.1) 유클리드 거리
- 두 점 사이의 거리를 계산하는 방법
- 이 거리를 이용하여 유클리드 공간 정의


1.2) 계층적 군집분석 (hierarchical)
- 유클리드 거리를 이용한 군집분석 방법
- 계층적으로 군집 결과 도출
- 탐색적 군집분석
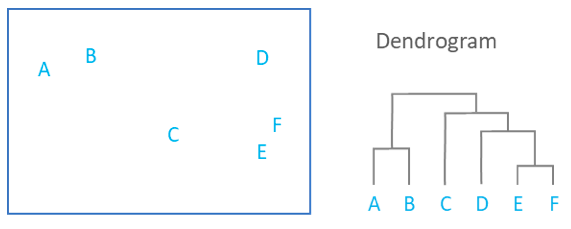
- 계층적 군집분석의 결과
=> 덴드로그램 (Dendrogram) : 표본들이 군을 형성하는 과정을 나타내는 나무 형식의 그림
- 군집 수는 사용자가 정할 수 있음 (2집단, 3집단, ... 등)
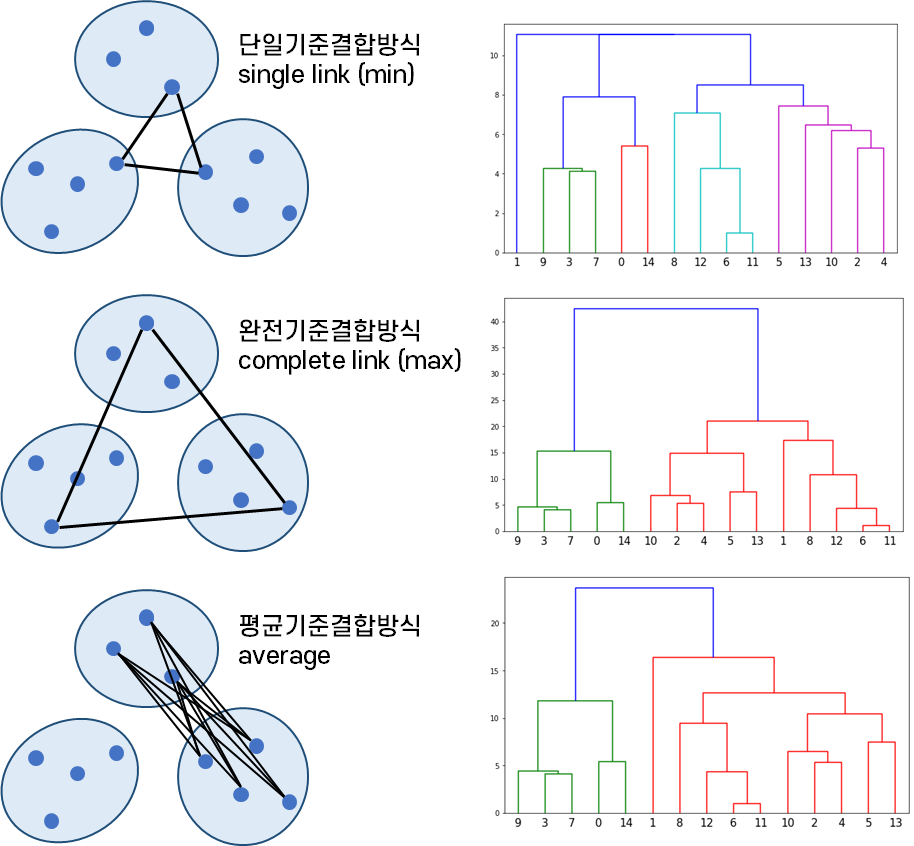
- 군집화 방식
① 단일기준결합방식 : 각 군집에서 중심으로부터 거리가 가까운 것 1개씩 비교하여 가장 가까운 것끼리 군집화
② 완전기준결합방식 : 각 군집에서 중심으로부터 가장 먼 대상끼리 비교하여 가장 가까운 것끼리 군집화
③ 평균기준결합방식 : 한 군집 안에 속해 있는 모든 대상과 다른 군집에 속해있는 모든 대상의 쌍 집합에 대한 거리를 평균 계산하여 가장 가까운 것끼리 군집화
2) 비계층적 군집분석 (k-Means)
- 계층적 군집분석보다 속도 빠름
- 군집의 수를 알고 있는 경우 이용
- k는 미리 정하는 군집 수
- 확인적 군집분석
- 계층적 군집화의 결과에 의거하여 군집 수 결정
- 변수보다 관측대상 군집화에 많이 이용
- 군집의 중심(Cluster Center)은 사용자가 정함
> k-평균(k-Menas) 군집분석 알고리즘
① k값을 초기값으로, k개의 centroid 선정 (랜덤)
② 각 데이터 포인터를 가장 가까운 centroid에 할당
③ centroid에 할당된 모든 데이터 포인트의 중심 위치 계산 (centroid 재조정)
④ 재조정된 centroid와 가장 가까운 데이터 포인트 할당
⑤ centroid 재조정이 발생되지 않을 때까지 ③, ④단계 반복
3) K-Means 군집화의 원리
“K“는 데이터 세트에서 찾을 것으로 예상되는 클러스터(그룹) 수를 말한다.
“Means“는 각 데이터로부터 그 데이터가 속한 클러스터의 중심까지의 평균 거리를 의미한다. (이 값을 최소화하는 게 알고리즘의 목표가 된다.)
K-Means에서는 이걸 구현하기 위해 반복적인(iterative) 접근을 취한다.
일단 K개의 임의의 중심점(centroid)을 배치하고
각 데이터들을 가장 가까운 중심점으로 할당한다. (일종의 군집을 형성한다.)
군집으로 지정된 데이터들을 기반으로 해당 군집의 중심점을 업데이트한다.
2번, 3번 단계를 그래서 수렴이 될 때까지, 즉 더이상 중심점이 업데이트 되지 않을 때까지 반복한다.
그림으로 보면 아래와 같다.
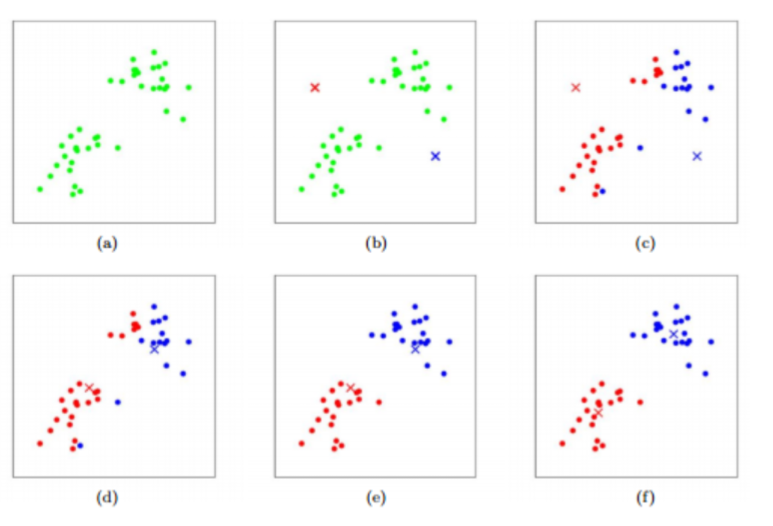
여기서 일단 k 값은 2다. 그래서 (b)에서 일단 중심점 2개를 아무 데나 찍고, (c)에서는 각 데이터들을 두 개 점 중 가까운 곳으로 할당한다. (d)에서는 그렇게 군집이 지정된 상태로 중심점을 업데이트 한다. 그리고 (e)에서는 업데이트 된 중심점과 각 데이터들의 거리를 구해서 군집을 다시 할당하는 거다.
이걸 계속 반복~
아무튼 이렇게 군집화를 해놓으면 새로운 데이터가 들어와도 그게 어떤 군집에 속할지 할당해줄 수 있게 되는 셈이다.
만약 두 점 사이의 거리에 대해 좀 더 자세히 알고 싶다면 아래 포스팅을 참고하자.
4. scikit-learn 사용법
파이썬 라이브러리 scikit-learn를 사용하면 K-means를 매우 쉽게 적용해볼 수 있다.
from sklearn.cluster import KMeans
model = KMeans(n_clusters=k)
model.fit(data)
model.predict(samples)
5. K값, 군집의 개수 정하기
군집화를 하기 위해서는 몇개의 군집이 적절할지 결정해야 하는데, 그러려면 일단 “좋은 군집”이란 무엇인지 정의할 수 있어야 한다.
만약 군집화가 잘 되었면 각 군집의 샘플이 가까운 거리에서 오밀조밀하게 묶일 거다. 군집 내의 데이터들이이 얼마나 퍼져 있는지 (혹은 얼마나 뭉쳐있는지) 응집도는 inertia 값으로 확인한다. inertia는 각 데이터로부터 자신이 속한 군집의 중심까지의 거리를 의미하기 때문에 inertia 값이 낮을수록 군집화가 더 잘 됐다고 볼 수 있는 거다.
sciklit-learn으로 모델을 만들었다면 이렇게 찍어보면 끝이다.
print (model.inertia_)
그래서 군집의 개수, 즉 k 값을 바꿔가면서 inertia를 그래프로 표시하면 보통 이런 모양새가 나온다.
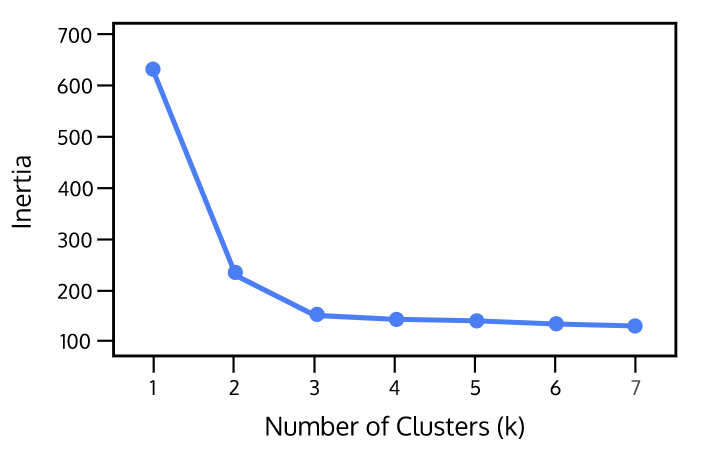
k값이 증가하면 intertia 값은 감소하다가 어느정도 수준이 되면 거의 변화를 안 보이게 된다. 대부분의 경우 너무 많지 않은 군집으로 분류하면서도 intertia 값이 작은 상태. 이게 그나마 최선이 될 거다. 위의 그래프를 예로 들면 최적의 클러스터 수는 3으로 보인다.
6)
# -*- coding: utf-8 -*-
"""
Created on Fri Jul 23 06:02:28 2021
@author: kimrujin
"""
import pandas as pd # dataset load
from sklearn.cluster import KMeans # model
import matplotlib.pyplot as plt # 시각화
iris = pd.read_csv("./iris.csv")
iris.info()
irisDF = iris[['Sepal.Length', 'Petal.Length']] # 두 개의 칼럼만 이용
irisDF.head()
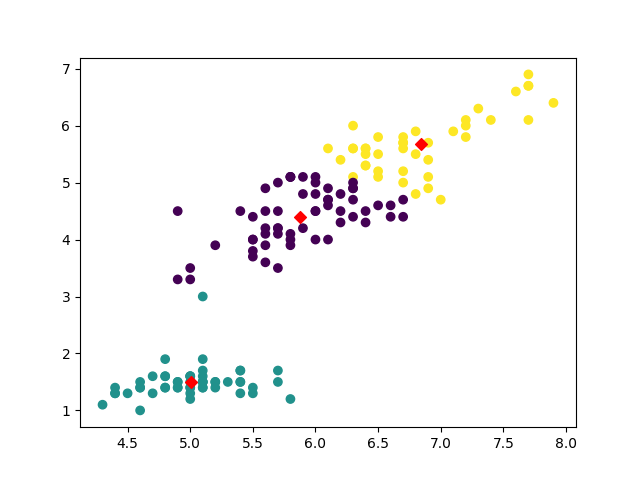
model = KMeans(n_clusters=3, random_state=0, algorithm='auto')
# n_clusters=3 : 군집의 개수 (k) (이미 알고 있음)
# random_state=0 : seed 역할 (모델을 일정하게 생성 = 랜덤X)
model.fit(irisDF)
pred = model.predict(irisDF)
pred
len(pred) # 150 (관측치 개수만큼 예측치 생성됨)
plt.scatter(x=irisDF['Sepal.Length'], y=irisDF['Petal.Length'], c=pred)
centers = model.cluster_centers_
centers
'''
array([[5.00784314, 1.49215686],
[5.87413793, 4.39310345],
[6.83902439, 5.67804878]])
'''
# 군집별 중앙값 시각화
plt.scatter(x=centers[:,0], y=centers[:,1], marker='D', c='r')
# marker='D', c='r' : 마커 모양은 Diamond, 색깔은 red
plt.show()
# 군집결과와 중앙값 함께 시각화
plt.scatter(x=irisDF['Sepal.Length'], y=irisDF['Petal.Length'], c=pred)
plt.scatter(x=centers[:,0], y=centers[:,1], marker='D', c='r')
plt.show()runfile('D:/RaspberryPiProjects/basic/kmeans.py', wdir='D:/RaspberryPiProjects/basic')
<class 'pandas.core.frame.DataFrame'>
RangeIndex: 150 entries, 0 to 149
Data columns (total 5 columns):
# Column Non-Null Count Dtype
--- ------ -------------- -----
0 Sepal.Length 150 non-null float64
1 Sepal.Width 150 non-null float64
2 Petal.Length 150 non-null float64
3 Petal.Width 150 non-null float64
4 Species 150 non-null object
dtypes: float64(4), object(1)
memory usage: 6.0+ KB
3. 은행 로그인 화면 만들기
def show_account_window(user_id):
    account_window = tk.Toplevel(root)
    account_window.title("Account Management")

    tk.Label(account_window, text=f"Welcome, {accounts[user_id]['name']}!", font=('Helvetica', 14, 'bold')).pack(pady=10)

    deposit_button = tk.Button(account_window, text="Deposit", command=lambda: show_transaction_window(user_id, "Deposit"))
    withdraw_button = tk.Button(account_window, text="Withdraw", command=lambda: show_transaction_window(user_id, "Withdraw"))

    deposit_button.pack(pady=10)
    withdraw_button.pack(pady=10)

def show_transaction_window(user_id, transaction_type):
    transaction_window = tk.Toplevel(root)
    transaction_window.title(f"{transaction_type} Money")

    tk.Label(transaction_window, text=f"Current Balance: ${accounts[user_id]['balance']}", font=('Helvetica', 12)).pack(pady=10)

    amount_label = tk.Label(transaction_window, text=f"Enter {transaction_type} Amount:", font=('Helvetica', 12))
    amount_entry = tk.Entry(transaction_window, font=('Helvetica', 12))
    perform_transaction_button = tk.Button(transaction_window, text=f"{transaction_type}", font=('Helvetica', 12, 'bold'), command=lambda: perform_transaction(user_id, transaction_type, amount_entry.get(), transaction_window))

    amount_label.pack()
    amount_entry.pack(pady=10)
    perform_transaction_button.pack()

def perform_transaction(user_id, transaction_type, amount, transaction_window):
    try:
        amount = float(amount)
        if transaction_type == "Deposit":
            accounts[user_id]['balance'] += amount
        elif transaction_type == "Withdraw":
            if amount <= accounts[user_id]['balance']:
                accounts[user_id]['balance'] -= amount
            else:
                messagebox.showerror("Error", "Insufficient funds.")
                return

        messagebox.showinfo("Success", f"{transaction_type} successful! New balance: ${accounts[user_id]['balance']}")
        transaction_window.destroy()
    except ValueError:
        messagebox.showerror("Error", "Invalid amount. Please enter a valid number.")

if __name__ == "__main__":
    root = tk.Tk()
    root.title("Bank System")

    # Login window
    login_frame = tk.Frame(root, padx=20, pady=20)
    login_frame.pack()

    tk.Label(login_frame, text="Welcome to the Bank", font=('Helvetica', 16, 'bold')).grid(row=0, columnspan=2, pady=10)
    tk.Label(login_frame, text="ID:", font=('Helvetica', 12)).grid(row=1, column=0, sticky="e", pady=5)
    tk.Label(login_frame, text="Password:", font=('Helvetica', 12)).grid(row=2, column=0, sticky="e", pady=5)

    id_entry = tk.Entry(login_frame, font=('Helvetica', 12))
    password_entry = tk.Entry(login_frame, show="*", font=('Helvetica', 12))

    id_entry.grid(row=1, column=1, pady=5)
    password_entry.grid(row=2, column=1, pady=5)

    login_button = tk.Button(login_frame, text="Login", font=('Helvetica', 12, 'bold'), command=login)
    signup_button = tk.Button(login_frame, text="Sign Up", font=('Helvetica', 12, 'bold'), command=show_signup_window)

    login_button.grid(row=3, column=1, pady=10)
    signup_button.grid(row=3, column=2, pady=10)

    root.mainloop()
from tkinter import *
from tkinter import messagebox

root = Tk()
root.title("Login")
root.geometry('925x500+300+200')
root.configure(bg="#fff")
root.resizable(False,False)


img = PhotoImage(file='login.png')
Label(root, image=img,bg='white').place(x=50, y=50)

frame = Frame(root,width=350, height=350, bg="white")
frame.place(x=480, y=70)

heading = Label(frame, text="Sign in", fg="#57a1f8", bg="white",font=("Microsoft YaHei UI Light",23,"bold"))
heading.place(x=100, y=5)

####### ID 입력창 #######------------------------------------------------------------------------------
def on_enter(e):
    user.delete(0, "end")

def on_leave(e):
    name=user.get()
    if name =="":
        user.insert(0,"Username")


user = Entry(frame, width=25, fg="black", border=0,bg="white",font=("Microsoft YaHei UI Light", 11))
user.place(x=30, y=80)
user.insert(0, "Username")
user.bind("<FocusIn>", on_enter)
user.bind("<FocusOut>", on_leave)

Frame(frame,width=295,height=2,bg="black").place(x=25, y=107)

####### Password 입력창 #######------------------------------------------------------------------------
def on_enter(e):
    code.delete(0, "end")
    code.config(show="*")

def on_leave(e):
    name=code.get()
    if name =="":
        code.insert(0,"Password")

code = Entry(frame, width=25, fg="black", border=0,bg="white",font=("Microsoft YaHei UI Light", 11))
code.place(x=30, y=150)
code.insert(0, "Password")
code.bind("<FocusIn>", on_enter)
code.bind("<FocusOut>", on_leave)

Frame(frame,width=295,height=2,bg="black").place(x=25, y=177)


####### 버튼 #######------------------------------------------------------------------------

Button(frame,width=39,text="Sign in", bg="#57a1f8", fg="white", border=0).place(x=35,y=204)
label=Label(frame, text="Don't have an account?", fg="black", bg="White",font=("Microsoft YaHei UI Light", 9))
label.place(x=75, y=270)

sign_up =Button(frame, width=6, text="Sign up", border=0, bg="white", cursor="hand2", fg="#57a1f8")
sign_up.place (x=215,y=270)


root.mainloop()'AIoT' 카테고리의 다른 글
| AIoT 정규 16일차 (0) | 2024.01.19 |
|---|---|
| AIoT 정규 15일차 (0) | 2024.01.18 |
| AIoT 정규 12일차 (2) | 2024.01.15 |
| AIoT 정규 11일차 (0) | 2024.01.12 |
| AIoT 정규 10일차 (1) | 2024.01.11 |