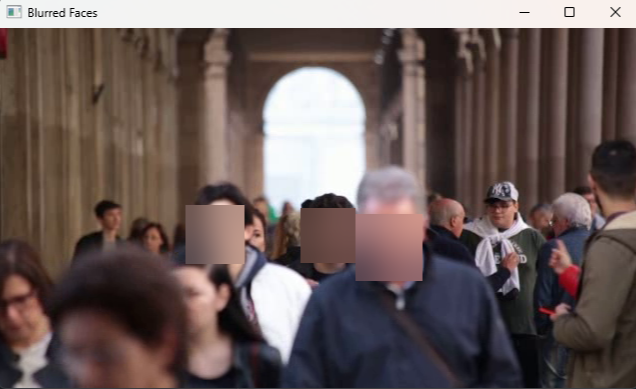
OpenCV를 이용해서 얼굴 블러처리 하기
: OpenCV를 활용해서 간단하게 이미지나 비디오 파일을 블러 처리할 수 있게 만들어 보겠다.
"blur_image.py" 파일과 "blur_video.py" 파일로 각각 사진과 영상 파일을 처리할 수 있고, 영상 파일의 크기 조절이 필요할 시 "video_resizing.py" 파일로 동영상 파일명을 입력해서 처리할 수 있습니다.
- "blur_image.py"
import face_recognition
import cv2

def blur_faces_in_image(image_path):
    # 이미지 파일 경로 설정
    img = face_recognition.load_image_file(image_path)

    # 얼굴 위치 정보를 찾습니다.
    face_locations = face_recognition.face_locations(img)

    # OpenCV로 이미지를 다시 불러옵니다.
    image_cv2 = cv2.imread(image_path)

    # 얼굴 위치에 Blur 처리.
    for top, right, bottom, left in face_locations:
        # 얼굴 영역 추출
        face = image_cv2[top:bottom, left:right]

        # Blur 처리 (가우시안 블러 사용)
        blurred_face = cv2.GaussianBlur(face, (0, 0), 30)

        # Blur 처리된 얼굴을 원본 이미지에 다시 삽입
        image_cv2[top:bottom, left:right] = blurred_face

    # 이미지를 화면에 출력합니다.
    cv2.imshow('Blurred Faces', image_cv2)
    cv2.waitKey(0)
    cv2.destroyAllWindows()

# 이미지 파일 경로 설정
image_path = './img/image (1).jpg'
blur_faces_in_image(image_path)
- "blur_video.py"
import cv2

def blur_faces_in_video(video_path):
    # 비디오 파일 열기
    cap = cv2.VideoCapture(video_path)

    while True:
        # 프레임 읽기
        ret, frame = cap.read()

        if not ret:
            break

        # 얼굴 검출
        face_cascade = cv2.CascadeClassifier(cv2.data.haarcascades + 'haarcascade_frontalface_default.xml')
        gray = cv2.cvtColor(frame, cv2.COLOR_BGR2GRAY)
        faces = face_cascade.detectMultiScale(gray, scaleFactor=1.1, minNeighbors=5, minSize=(30, 30))

        # 얼굴에 가우시안 블러 적용
        for (x, y, w, h) in faces:
            face_roi = frame[y:y+h, x:x+w]
            blurred_face = cv2.GaussianBlur(face_roi, (99, 99), 20)
            frame[y:y+h, x:x+w] = blurred_face

        # 화면에 출력
        cv2.imshow('Blurred Faces', frame)

        # q 입력시 break
        if cv2.waitKey(1) & 0xFF == ord('q'):
            break

    # 비디오 파일 닫기
    cap.release()
    cv2.destroyAllWindows()

# 동영상 파일 경로 설정
video_path = './video/walking_people_resized.mp4'
blur_faces_in_video(video_path)
- "video_resizing.py"
import cv2

def resize_video(video_path, output_path, target_height):
    cap = cv2.VideoCapture(video_path)
    fourcc = cv2.VideoWriter_fourcc(*'XVID')
    out = cv2.VideoWriter(output_path, fourcc, 30.0, (640, target_height))

    while True:
        ret, frame = cap.read()
        if not ret:
            break

        # 프레임 크기 조절
        resized_frame = cv2.resize(frame, (640, target_height))

        # 조절된 프레임 저장
        out.write(resized_frame)

        # q 누르면 종료
        if cv2.waitKey(1) & 0xFF == ord('q'):
            break

    cap.release()
    out.release()
    cv2.destroyAllWindows()

# 동영상 파일 경로 설정
video_title = str(input("type the video title: "))
video_path = f'./video/{video_title}.mp4'
output_path = f'./video/{video_title}_resized.mp4'
target_height = 360
resize_video(video_path, output_path, target_height)
eg.

'AIoT' 카테고리의 다른 글
| AIoT 정규 63일차 (0) | 2024.04.09 |
|---|---|
| AIoT 정규 62일차 (0) | 2024.04.08 |
| AIoT 정규 60일차 - Git (0) | 2024.04.04 |
| AIoT 정규 59일차 (1) | 2024.04.03 |
| AIoT 정규 58일차 (2) | 2024.04.02 |